Friday, 17 December 2010

Targets

Most of us are aware that the SMART target setting system is the most congressive technique when wanting to improve in a specific area. The target areas in which i am going to improve my knowledge in are;
  • Lighting - To improve lighting i will practice filming in dark and light rooms and adjust lighting to see how effective light can be. From doing this i will be able to create more effective light in our opening sequence giving it a better overall look and hopefully improving the quality of the film. This target is very important as poor lighting whilst filming can lead to a dull and bleak look in the poverall film, if done correctly this can improve the quality of the shoot dramatically.

  • Team Organisation - To improve team organisation it will help our group to be motivated and also hopefully we will be able to complete the process in the given time. as a group we were not as organised as we could be in the pre-liminary filming, this could be improved by meeting at least once a week to asses the work we have completed and also complete work that we need the whole group there to do.

  • Setting - To improve setting we will have to spend more time seacrhing for the best possible location, this will help us as a group improve the quality of the film as setting it crucial in any film. With setting i am including the props that are going to be used, have to be of a good quality to make the film look as dramatic as possible. This will mainly be achieved with patients of finding the best possible setting available for us to use.

  • Editing - To improve editing i will have to get used to the editing suite, i can do this by editing small films as part of my independant study, this will help me progree in editing and also it will help the group complete the process further.

  • Blogging - To improve my blog i will have to spend more time on each post, this is to ensure that everything in the blog is understandable and also of a high standard. Another blogging point i need to improve is the structure of the post, to make it look presentable i can make as many changes as needed until it looks of a high quality. This can be done by previewing the post regularly to make sure that the images and texts are positioned correctly.
The way that i am going to improve my knowledge in these area's is going to help me a great amount further along in the course as i will be able to relate back to my independant study for revision and help on the specific area.

Tuesday, 7 December 2010

Evaluation of Skills Developed

Overall i feel that the first and second attempt of filiming i have learnt a great amount in which i will use to continue to progress my knowldge in the subject. I feel that as a group we worked incredibly well and we were very organised in our filming and set design.

Throughout the preliminary task i have progressed skills that i already have and have also found new skills in which i have learnt from the task so far. The key areas in which i have developed are;

Technical Skills - I have developed a vast amount in this area, as i have had no experience in filming i was able to learn a lot from my first pre liminary task. I learnt how to position the camera for the most effective angle for our shots throughout our filming.

Creative Skills - I also developed my Creative skills a substantial amount, i was able to create the scene and setting so that the viewer can see clearly what enviroment we are trying to create. Another way in which i improved my creative skills is the editing of the film, as a group we was able to choose what we wanted to be in our production and what we did not want. The music we added gave the intetnsity to the overall production which makes the filim a great deal more dramatic.

Personal Skills - Just from completing the preliminary task i have improved my media and technological knowledge a huge amount. I have learnt how to use the handheld camera and also i have lernt how to edit a shot on a computer. Other things i have learnt from the pre-lim task are how to stick to the role of thirds and continuity. The main problem we occured was that in our first attempt we did not enforce the usage of shot-reverse-shot, we was able to correct this with a second shooting and we learnt from our mistakes very well.

Tuesday, 23 November 2010

Production Report

As a pre-liminary task, the shoot as whole went very well, apart from the amateur acting the filming was a success the second time around. There were a few problems that the group encountered throughout the filming process, the main one was that the first time we filmed we did not shoot from correct angles, we was not able to create a shot reverse shot because of the narrow width of the room. This meant we would have to re-film the sequence to ensure the shot reverse shot has been used. The second problem was the smallness of the room, as the room was so small it was tough to get the camera angles in which we was looking to shoot with. Although, we were able to manoveur as a group and succeeded in the filming, capturing a good amount of strong footage. The second problem was that we had several continuity errors in which made the editing really tough, we were able to over-come this by re shooting parts in order to make the final production improved. As a team i feel that we worked very well, we looked at angles to film from as a group and if one of us was nto happy with a shot then we would re-shoot.

The footage that we have shoot as a group was of a good quality, there were some parts which looked strange but with small editiing this was over comed. The main area in which we could improve in is the efficiency of our shooting angles, we had many problems becuase of the light being provided from the room, from one side of the room it was dark whereas when we filmed towards the door the light was bright. This can be over comed by small editing of the light in the filming. We abided by the rules of continuity well with only the smallness of the room giving us our main minor problem.

Overall the filming went well, As a group we were able to move props around in order to create the space we needed to create the shot reverse shot that we did not have in the 1st time of shooting. After learning from our mistakes we knew what was needed, after shooting a 2nd time round the footage we shoot was very good.

Tuesday, 2 November 2010

Pre-Production Documentation

Location Recce:

 
Technical Recce: As the room we are using is of a small size there were no reastrictions ion shooting. for the look we wanted we had to add a few features into the room such as a table and a chair, as these were our largest props.
Risk Assessment:
If there was a fire there are 3 exits out of the room, one is the main entrance, the second into a second room and there is a third door leading into the 3rd room.

There is a table in the room and somebody may bump into them causing themselves injury, to avoid this, all of the crew need to be warned about the hazard and act sensibly at all times.

The chairs could be tripped over if they are not tucked away properly; all chairs need to be moved out of the way once they have been used.

Power supplies could be a risk if they are left on and touched. All power supplies need to be noted and all the back stage crew and actors need to have a wear of where they are.

We need a risk assessment so that we can see what risks there are during the filming and how we can avoid any injuries.

Shooting Schedule: Our shooting was organised in a lesson and we decided as a group that we would shot on tuesday in our second media lesson. The location was organised previously and we started filimg at 11 o'clock. We shot the scene and we finished filming at 1:30, the shooting was successful.

Mise-en-Scene:
Lighting:
In the TC block corridor there is a main door which will provide manmade natural sunlight, this will brighten the room enough to make it look cell like.

Props:
There will be one table acting as a bed for the patient with a duvet over the top, we will also need a black curtain to cover over the door that comes into shot.

Costume:
LIAM- Lab coat backwards to look like patient.
JACK- White lab coat, with black trousers.
With these costumes it fits the theme of the characters and more authentic.

Hair and Make-Up:
LIAM - Hair will be messy, face will look tired.
JACK - hair will be formal, maybe glasses to emphasize character.
LIAMS hair will be messy to make the audience see that he is a troubled person. We have made JACK  wear a lab coat to show his doctor characteristics.

Set Design:
The room is spacious and sets a good atmosphere for a cell. It has 2 door windows at the ront of the room with a dark carpet. There is one light on the roof which will provide needed light.

Character Movement:
At the start of the filming JACK walks down the path and then through the wooden doors, he walks to the chair and sits down. LIAM is already sitting in his bed, as the dialogue continues both characters remain in the same posistion. At the end of the dialogue JACK stands up and walks towards LIAM in order to offer him medicine, LIAM bangs JACK's hand and drops the object, JACK picks the tablets up off the floor and walks out of the room.

Friday, 15 October 2010

Script Writing

 The reason for our group choosing to do a scene in a cell is because we feel that it is the most effective choice and we are able to present the camera shots in the best possible way. We will be using a small room to act as a cell, this will create a deep echo in our production making it more realisitic.


When LIAM pushes JACKs hand away we will need to shoot from the same angle so that no cut is involved, this will make the shot look more realistic and hopefully engage the audience more so than before.

Tuesday, 12 October 2010

Shot List and Storyboard


Plot of your Prelim script:

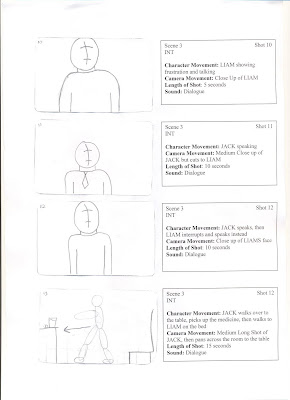
Our script is based in a cell with the patient inside and the doctor entering to give him his medicine. The setting of the small room is one table and a door with the table acting as a bed for the patient. To show the audience what we want, we will have to act well and know the script. It is important to have a plot for the script as it sets the scene so then all the cast know what they are doing, how to act and how to film.


Shot List:


Storyboard:


Tuesday, 5 October 2010

Jump Cuts, Over-the-Shoulder Shots, Cutaways and Point of View Shots.

Jump Cut - A jump cut is a cut in film editing in which two sequential shots of the same
subject are taken from camera positions that vary only slightly. This type of edit causes
the subject of the shots to appear to "jump" position in a discontinuous way.
 Link for further description of a Jump Cut


Over the shoulder shot - This is a shot filmed from behind character's shoulder: 
A cinematographic shot taken from over the shoulder of a character whose back
can be seen at the side of the frame


Cutaway Shot - A brief shot that interrupts the main action of a film, often to
depict related matter or supposedly concurrent action.


Point Of View Shot - A point of view shot, also known as POV shot is a short scene
 in a film that shows what a character is looking at. It is usually established by being
positioned between a shot of a character looking at something, and a shot showing
the character's reaction. In depth look at Point Of View Shot.


The link to this website is very useful given many differant types of shots
and examples - Camera Shots


This picture demonstartes the POV shot.


Camera Movement:


Tuesday, 28 September 2010

Continuity

Continuity is where something has the state or quality of being continous.

My definition of continuity in media is that everything that is involved in media from blogging all the way through to filming is of a continous and repetitve sequence.


Crossing the line is a very important concept in video and film production. It refers to an imaginary line which cuts through the middle of the scene, from side to side with respect to the camera. Crossing the line changes the viewer's perspective in such as way that it causes disorientation and confusion. For this reason, crossing the line is something to be avoided.
Please look at the link given for a further in depth definition of the 180 degree rule in media - 180 Degree Rule.

Shot-Reverse-Shot is a staple of editing in dialogue sequences. It utilizes the 180 degree rule, the eye line match, and rule of change among others. First things first, a definition of what shot/reverse shot is: Shot-Reverse-Shot

Wednesday, 22 September 2010

Storyboard Drawing, Shot Sizes and Framing.


Extreme Close Up
ECU
  
Close Up
CU


Medium Close Up
MCU
 In this post i have attched my own storyboard, with 7 differant camera angles which will be used in my production. I have also attached 7 differant photos that i have taken in whihc represent the differant camera angles i have drawn in my storyboard. Throughout my storyboard there are a variety of differnat shots from an extreme close-up to a long shot. 
 

Medium Shot
MS


3/4 Shot


Long Shot
LS


My Storyboard displaying different camera angles.
 

Medium Long Shot
MLS


My storyboard showing the straight shot in the top picture
and the reverse shot in the bottom one.

1st Shot
Reverse Shot


The rule of thirds

 This link explains the rule of thirds in brief detail ; Rule Of Thirds.
This is a perfect picture displaying the 'rule of thirds'
technique, as you are able to see the eye of the bee is
the centre of attention. This is a beautiful picture with
the bright colours from the bee and the plant being
emphasised well.


This picture shows that the rule of thirds is not always
necessary in order to take a good photograph. As you can
see, the plant is centered covering the entire photo space,
this brings out the center of the plant and its bright colours.


Friday, 17 September 2010

Preliminary Task Introduction

This is a continual task in which you are required to involve filming and editiing a character opening a door, crossing a room and sitting down in chair that is opposite of the other character, there is then going to be an exchange of dialogue, only a couple of line.this task should match on action, shot/reverse shot and the 180-degree rule.